|
|
|
|
|
|
|
|
Okay, so you have your 50cc beast of a scooter, but somehow 30mph just isnt enough, how can you get your "moped" to do a genuine 50MPH with better acceleration? well I am going to show & tell you, enjoy :-)
Okay, the first thing you need to note is that to legaly ride a full power 50cc vehicle you must be atleast 17 years of age to do so, as such this information is for educational perposes only! I do not accept any responsibility if you crash your de-restricted schooter at age 16 and as a result get arrested, fined, banned, killed etc: etc: etc:
Right, a 50cc scooter is restricted to 30mph as standard when it comes from the factory, this is for it to meet britains "moped motoring laws", the engin itself once allowed to perform to it's full capacity will be capable of 50-55mph with better acceleration & much better fuel consumption (typically 100+ MPG)
All 50cc scooters will be subjected to a mixture of the following restriction methods, each can be removed quite easily with the correct tools. A small washer
in the variator. Most modern scooters have some combination (or all) of the above restrictions. To properly de-restrict a scooter, you must do all of the parts. If you only do half the job, you could actually damage the scooter. Ask your dealer, or other enthusiasts who own the same scooter as you, to find out exactly where your model is restricted. Below is an example of derestricting an aprilla SR50 scooter, these methods will be the same for all scooters, but on yours the bolts may be in a slightly different place, but as a rule of thumb all 50cc engin's are more or less the same. .Removing the Variator Washer
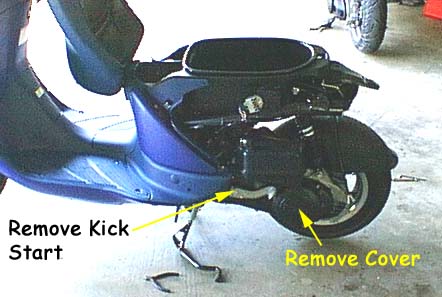
First start by removing the socket head cap screws to remove the transmission
cover on the left side of the scooter. Be careful of the gasket, my mojito had a
gasket, but my DiTech didn't. Ignore the 'remove kick start' in the photo below.
I am used to working on motorcycles, where the kick start is actually attached
to the crank and you have to remove it to get the cover off. But on these
scooters, you DO NOT have to remove the kick-start. In
fact, you do not need to remove the kick-start on any scooters to my
knowledge.
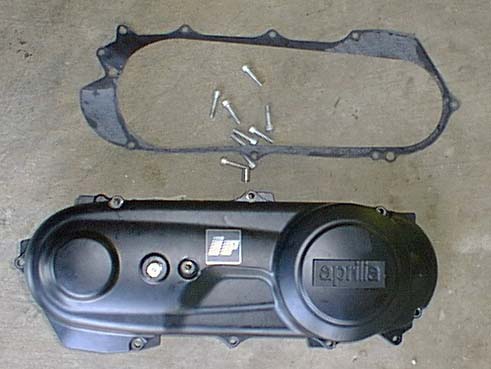
This is what you should have removed. Keep track of those screws and the
gasket. If your scooter does not have a gasket there, don't worry. The DiTech's
do not have one.
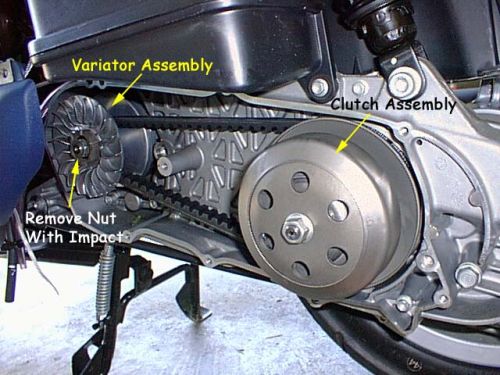
OK, now you should be looking at the whole drive train. As you face the open transmission, the variator is on the left, and the clutch is on the right. To remove the nut on the variator, you need an impact wrench. If you try to use a regular wrench on the nut, then you will just rotate the pulley around, and not get anything done. There are special tools that let you block the piston in place, or grip the variator to hold it still, but the best solution is an impact wrench! There are both electric models and pneumatic models available, for reasonable prices. Investing in an impact wrench will make your scooter maintenance live much easier. Removing the nut on the clutch is also best done with an impact wrench,
though you can also have a helper hold the rear brake down while you undo the
nut with a regular wrench.
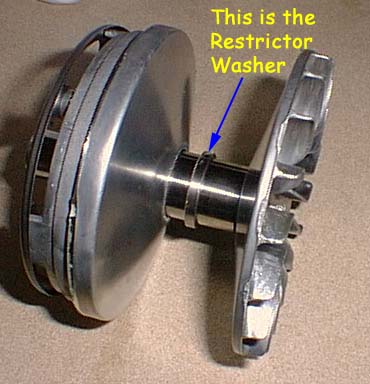
Once you have the variator off, you will notice a washer located between the
two halfs of the pulley. This is a restriction! That little washer does not let
the two halves come completely together, which prevents the scooter from going
into its highest gearing. For a good explanation of the transmission to help
understand why that washer does what it does, read the article CVT Basics. Removing it makes a big difference in top
speed.
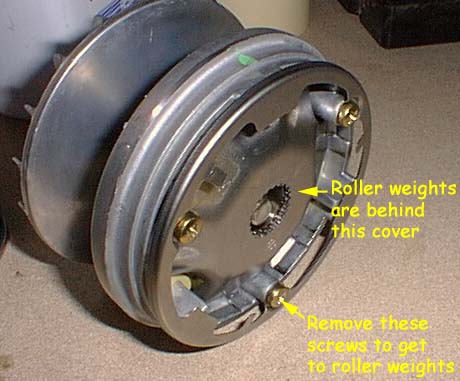
While we have the variator off, I will show you where the roller weights are
located, they are in the back of the variator. You have to remove three screws
to get to them. I left the little stamped cover off when I re-assembled
everything. It is not needed, and I have heard that it can sometimes impede the
variator from reaching its highest ratio.
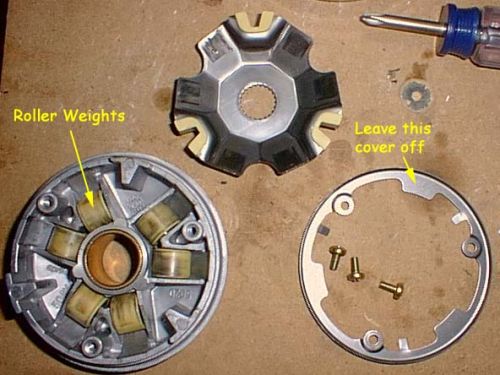
Once you have it apart, this is what it will look like. If you want to go to
a different weight, this is when you do it! If you are de-restricting a DiTech,
you may wish to change rollers at this point. Many people find the stock rollers
to be far too heavy, and have better performance with something in the 7.5g
range. If you are adding a performance exhaust system like the Gianelli NRX, then use the roller weights they have provided. To get
roller weights, check out the ApriliaForum store.
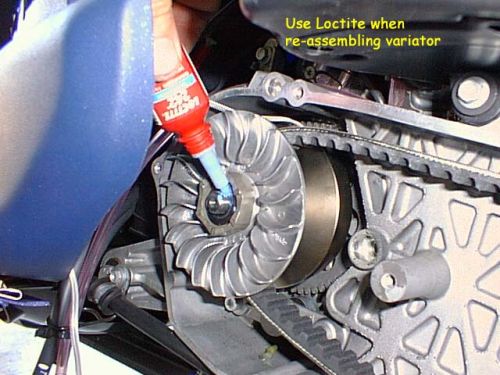
After the washer has been removed, re-assemble the variator onto the crank
shaft. Make sure the starter gear behind the variator is on the spline, and make
sure the variator is all the way pushed to the back before tightening the bolt.
The bolt must be impacted on, and be sure to use some Loc-Tite (use the Blue
version, it is removable) on the bolt before tightening the nut. It will have a
tendency to spin off, so LOCTITE IT!!! OK, that is it for the variator / washer restriction! Jet Restriction in the CarburetorNow, lets go to the carburetor. Here, the main jet is a bit too small, and should be changed. I am not sure what the stock jet size is, but it is small. Get yourself a larger main jet. I went with the .8mm jet, with shipping it was about 5 quid. Give Taffspeed Racing a call or email to find a new jet for your scooter.
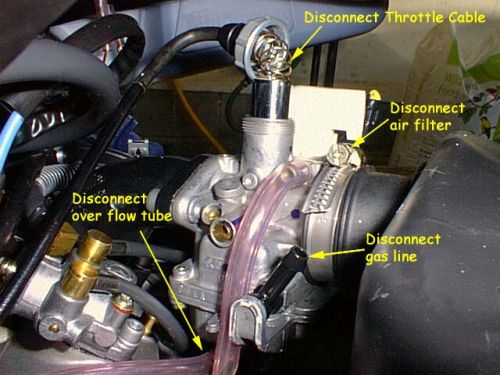
The first step is removing the carb. You have to disconnect all the cables
and hoses. Be careful when doing this, work in a clean enviroment. A little bit
of dirt in the carb is a bad thing! Keep needles from the choke and throttle
from touching anything. When the gas line is removed, stick a screw in it to
keep gas from leaking.
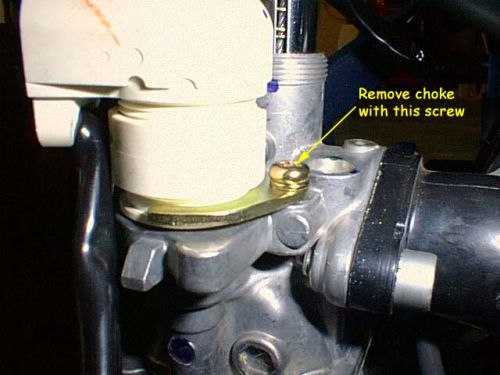
This is how you take off the choke.
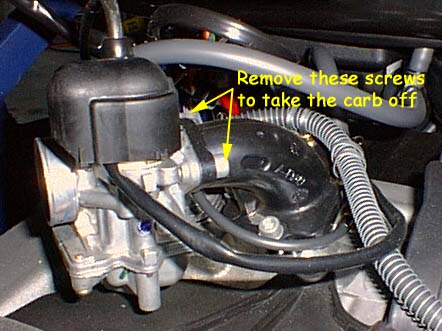
Once everthing has been disconnected, remove these screws to take off the
carb.
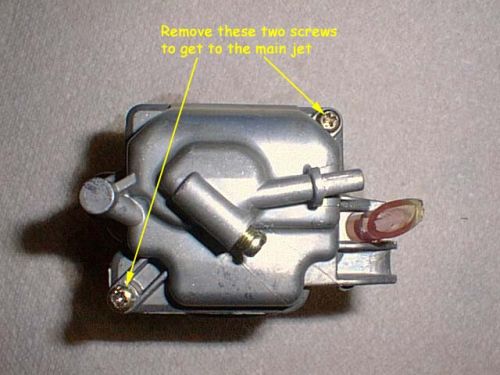
The carb is going to be filled with petrol, so be careful! No smoking, dummy!
Lay a paper towel down and flip the carb over. Remove the two screws on the
bottom and take off the bottom cover.
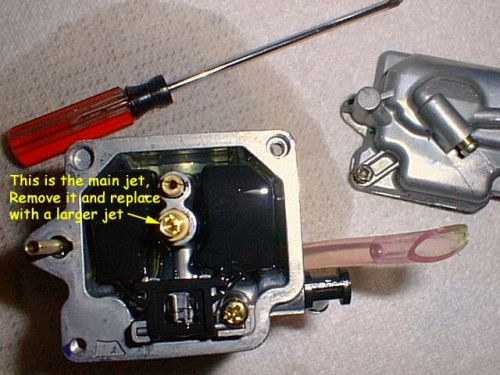
Use a clean flat-head screw driver to remove the jet. Simply screw in the new
larger jet in its place and re-assemble carb. Bolt the carb back on and
re-attach all the cables and hoses. When putting the throttle cable back in
there is a channel and a key that has to line up. Turn it until it lines up and
falls in all the way. Now you can reassemble in the order you disassembled, and we can move on to the exhaust system. Two Restrictions on the Exhaust SystemThere are actually 2 separate restrictions on the exhaust. I will be honest, it is a pain in the butt to do this. There is a lot of grinding and cutting involved. My honest opinion is don't bother, buy a performance exhaust! It is well worth the money, saves you some time and the performance exhaust will give you even better performance. But for those of you on a tight budget, I went ahead and de-restricted mine just so I could take pics to show you how to do it. Make sure you read this entire section before beginning this project, just to make sure you want to get into it. If you choose the route of a performance exhaust, go with something like the Leo Vinci ZX, or the Gianelli NRX, both of which are fine pipes. There are also some nice offerings by Arrow and Top Performances. Check out PM Tuning for pipes for your scooter.
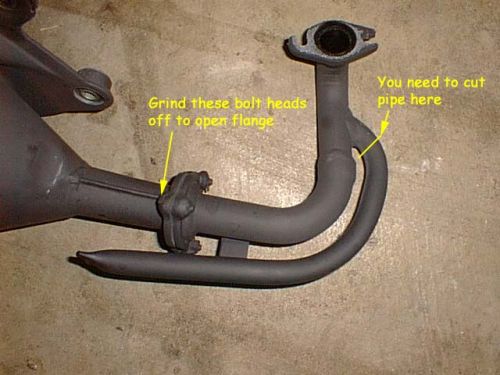
Start by removing your exhaust. Two bolts hold it to the engine, and three
bolts hold it to the side of the frame. Remove them all, and carefully remove
the exhaust. You will notice a flange with three bolts and a little pipe that
comes off the side of the main pipe and just comes to an end. We need to grind
the bolts off to get to an inner flange, and we have to cut off the little pipe
that extends to the side.
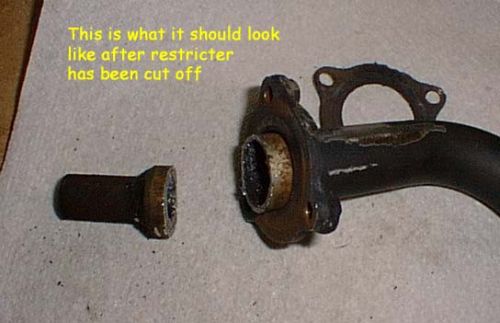
Once you have ground off the bolt heads, you will be able to see the
restrictor. You will notice a large pipe comming through the flange, but there
is a smaller pipe welded inside it. You now have to cut off the small pipe
behind the weld. Use a file to smooth out the burrs. Make sure you clean out all
the chips before re-assembling with new bolts.
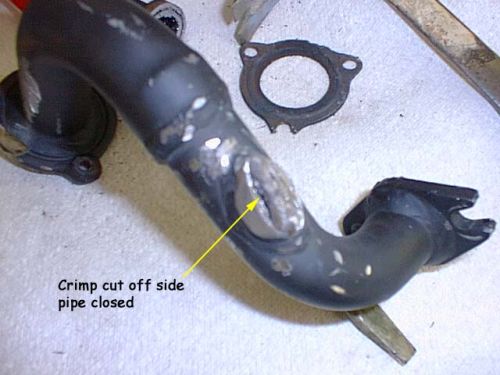
Now that little pipe that has to be cut off. The proper way to do this is to
cut it off and re-weld it shut. But if you are like me and welderless, I just
left enough pipe to crimp and fold it over. I put the end I cut off into my vise
and closed it until the pipe came together. After that I took a pair of vise
grips and bent the fold in half. Then I beat it with a hammer until it was
completely closed. After that I took a grinder and smoothed it over. I guess
some JB weld or some exhaust tape might work also. However you do it, it is
important that there not be any leaks here, or your performance will suffer!
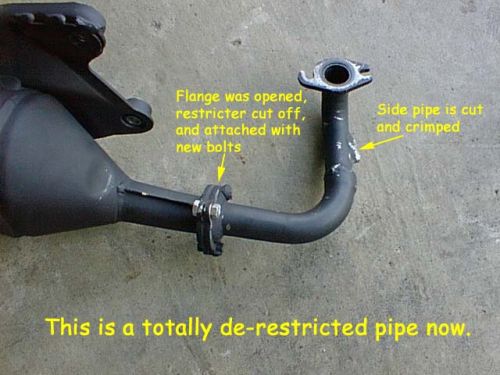
Now you need to re-assemble the exhaust. You are going to need some new bolts
to replace the ones you cut off. I was able to buy the same thread bolts and put
them through the nuts that were left welded to the other side of the flange. But
if the nuts are messed up on the bolts from the weld, then you will need to
grind the nuts off and use new nuts and bolts. Use some high temp black paint to
paint over all those unsightly grinding marks you made! But it should look like
this when you are done. OK, all you have to do now is re-attach the exhaust to your scooter. Be sure to get the gasket between the pipe and the head back in its place. If the gasket isn't very pristine looking, order another from your dealer and replace it. You don't want any leaks there. And that is it for de-restricting! Enjoy your scooter's new found performance! Again, for parts, I highly recommend Taffspeed racing . Iif you want to ask questions or just chat about scooters, the twist n go website & forum is a great place to go.
|